| S3
#50 - The Wire Below - Western Desert, Winter 1941-42
Allied Hidden Rules
Purpose
- For Frame 2 the Allies have the strategic advantage and may move three of their units first
- Relieve Tobruk by establishing a line of roads, railways or tracks from Tobruk to El Alamein = 8 points
- Destroy either 21st or 15th Panzer through attrition and ground combat = 3 Points each
- Destroy remaining axis divisions through attrition and ground combat = 1 Point each
- 70th Infantry Div strengthens the Tobruk garrison as long as it is inside the perimeter making it difficult for the Axis to take the town. 70th Inf can only move out of the perimeter to take either El Adem or El Duda.
- The remaining Allied divisions can either smash through the frontier garrisons to relieve Tobruk or swing out in a left hook. Becareful to protect your lines of communication, the panzers can move far and fast if their supply lines are not hit and can turn the tables on the Allies quickly.
- Cutting off units from supply is not immediately effective and those units can pass around to escape, hitting their supply lines slows them down making it hard for them to escape.
- Units are stronger in defense so often it is a war of position rather than outright attack. Attacks are resolved using the units strength and defensive posture but luck plays a large part. Do not attack unless the enemy is very weak or you like to gamble. If a unit losses a battle it must withdraw.
Hints
- Inside the Tobruk perimeter S19 is still operational. Just outside M3 is neutral and will fire on both sides.
- The Axis can base a/c on Crete
- CV group will be in the 5,7 cross area at T-30 for night ops.
- expect RN DD1s in the Gulf of Sollum patrolling and escorting a tanker into Tobruk and Mersa Matruh. Use the Sollum DD1s as protection as their ack will be quite impressive.
- expect lone oil tankers with an axis DD2 to try and sneak into Derna from Italy and Greece.
- Allied ground units are better all round than most of the Axis units except for the two Panzer divisions which should be the primary target of any tac air.
- Axis air reinforcements are not as plentiful as Allied and forward fields should be targeted to reduce the number of frontline fighters they can put up.
- Axis have greater numbers of bombers and strike a/c but the ability of Allied fighter units to bomb is also a strong advantage. The Hurribomber is very good in this role.
- target hardness and bomb strength has been adjusted to provide a more difficult and realistic ground attack experience, both individual and game scoring has been adjusted to reflect this. Please test in the S3 arena before game day so no surprises occur.
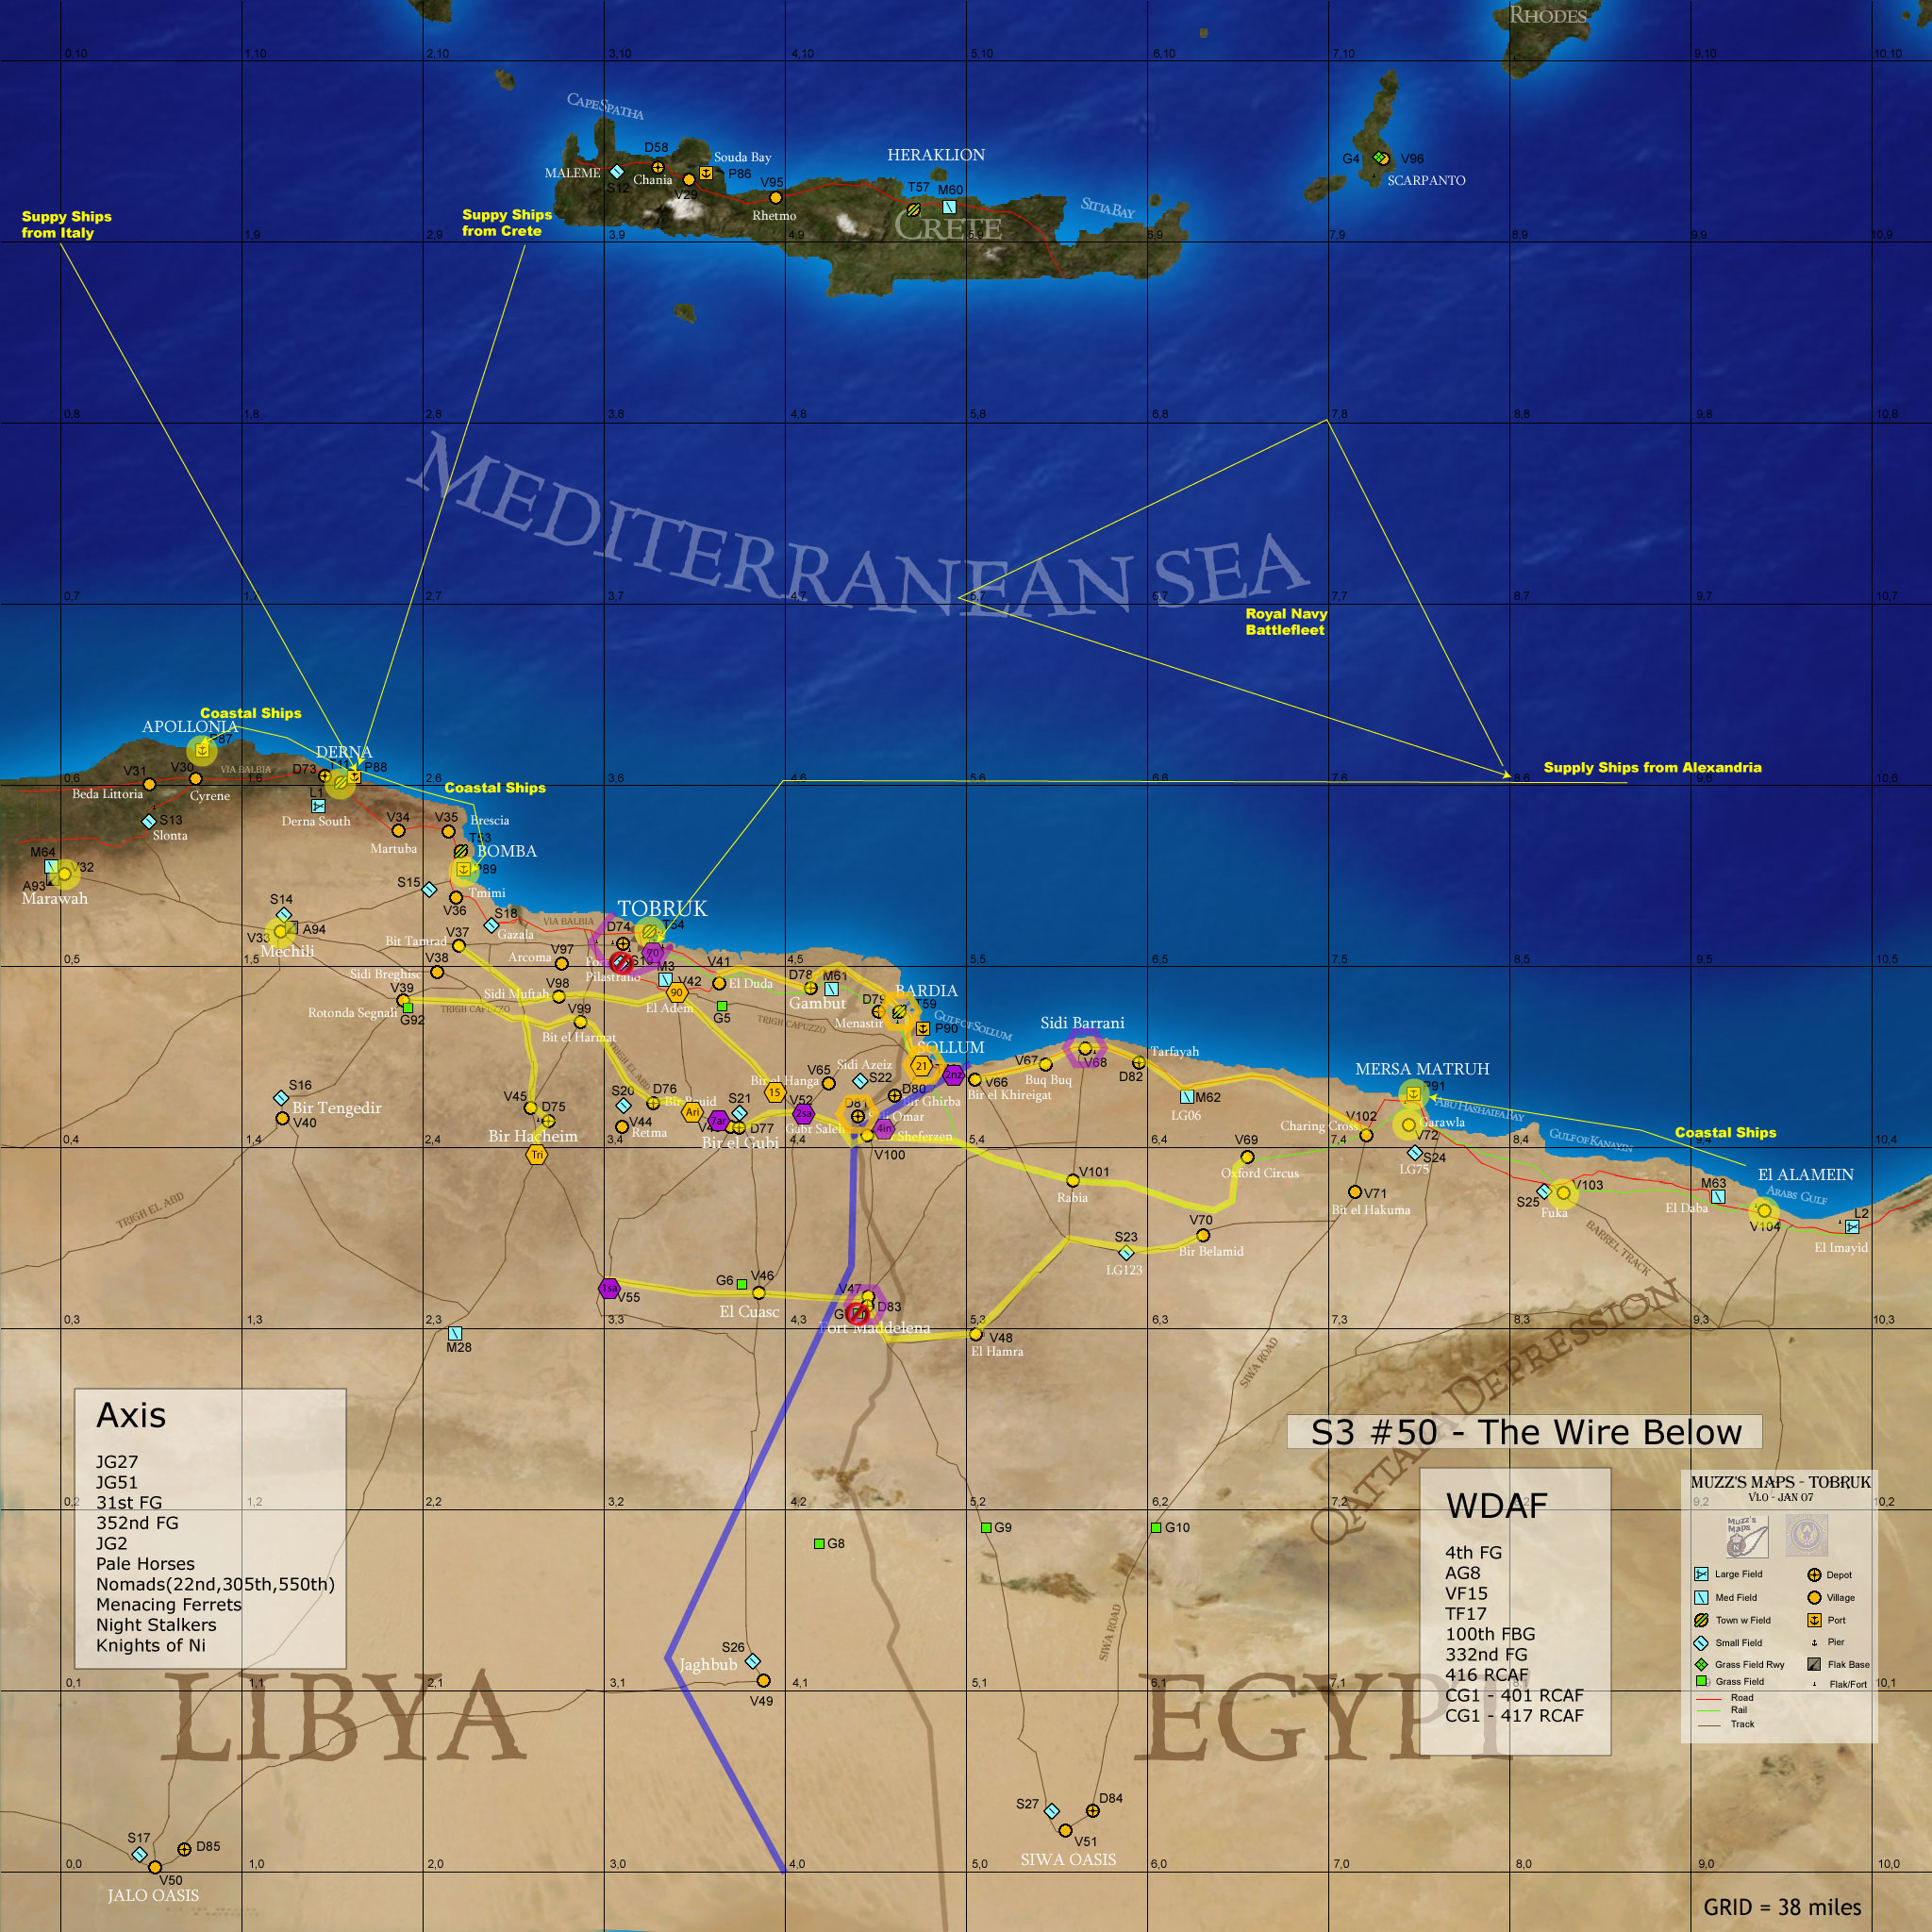
Frame 2 - MAP
- all a/c must fly with 85% fuel during frame
- G7 and S19 are closed for ops, G6 and S21 are open for ops.
- 6 new steps of P40Es, 3 steps of Hurri IIs
- Left Hook Option - the enemy has countered with reinforcing the Sollum garrison with 15 PZ and attacking V52 with the 21PZ. Sidi Omar and Sollum are possible attacks as is the 7th ARM against Ariete. Bombing Sollum and Sidi Omar is important as is reducing the very effective Panzers. Air protection for 7ARM and 2SA is required for them to remain strong for ground battle.
- if you decide to attack a garrison or ground unit by moving your units adjacent to it you have to first reduced it with heavy air attacks during the frame or have more than one unit attack it. The enemy could reinforce his garrison with his ground units in later movements so be aware of this.
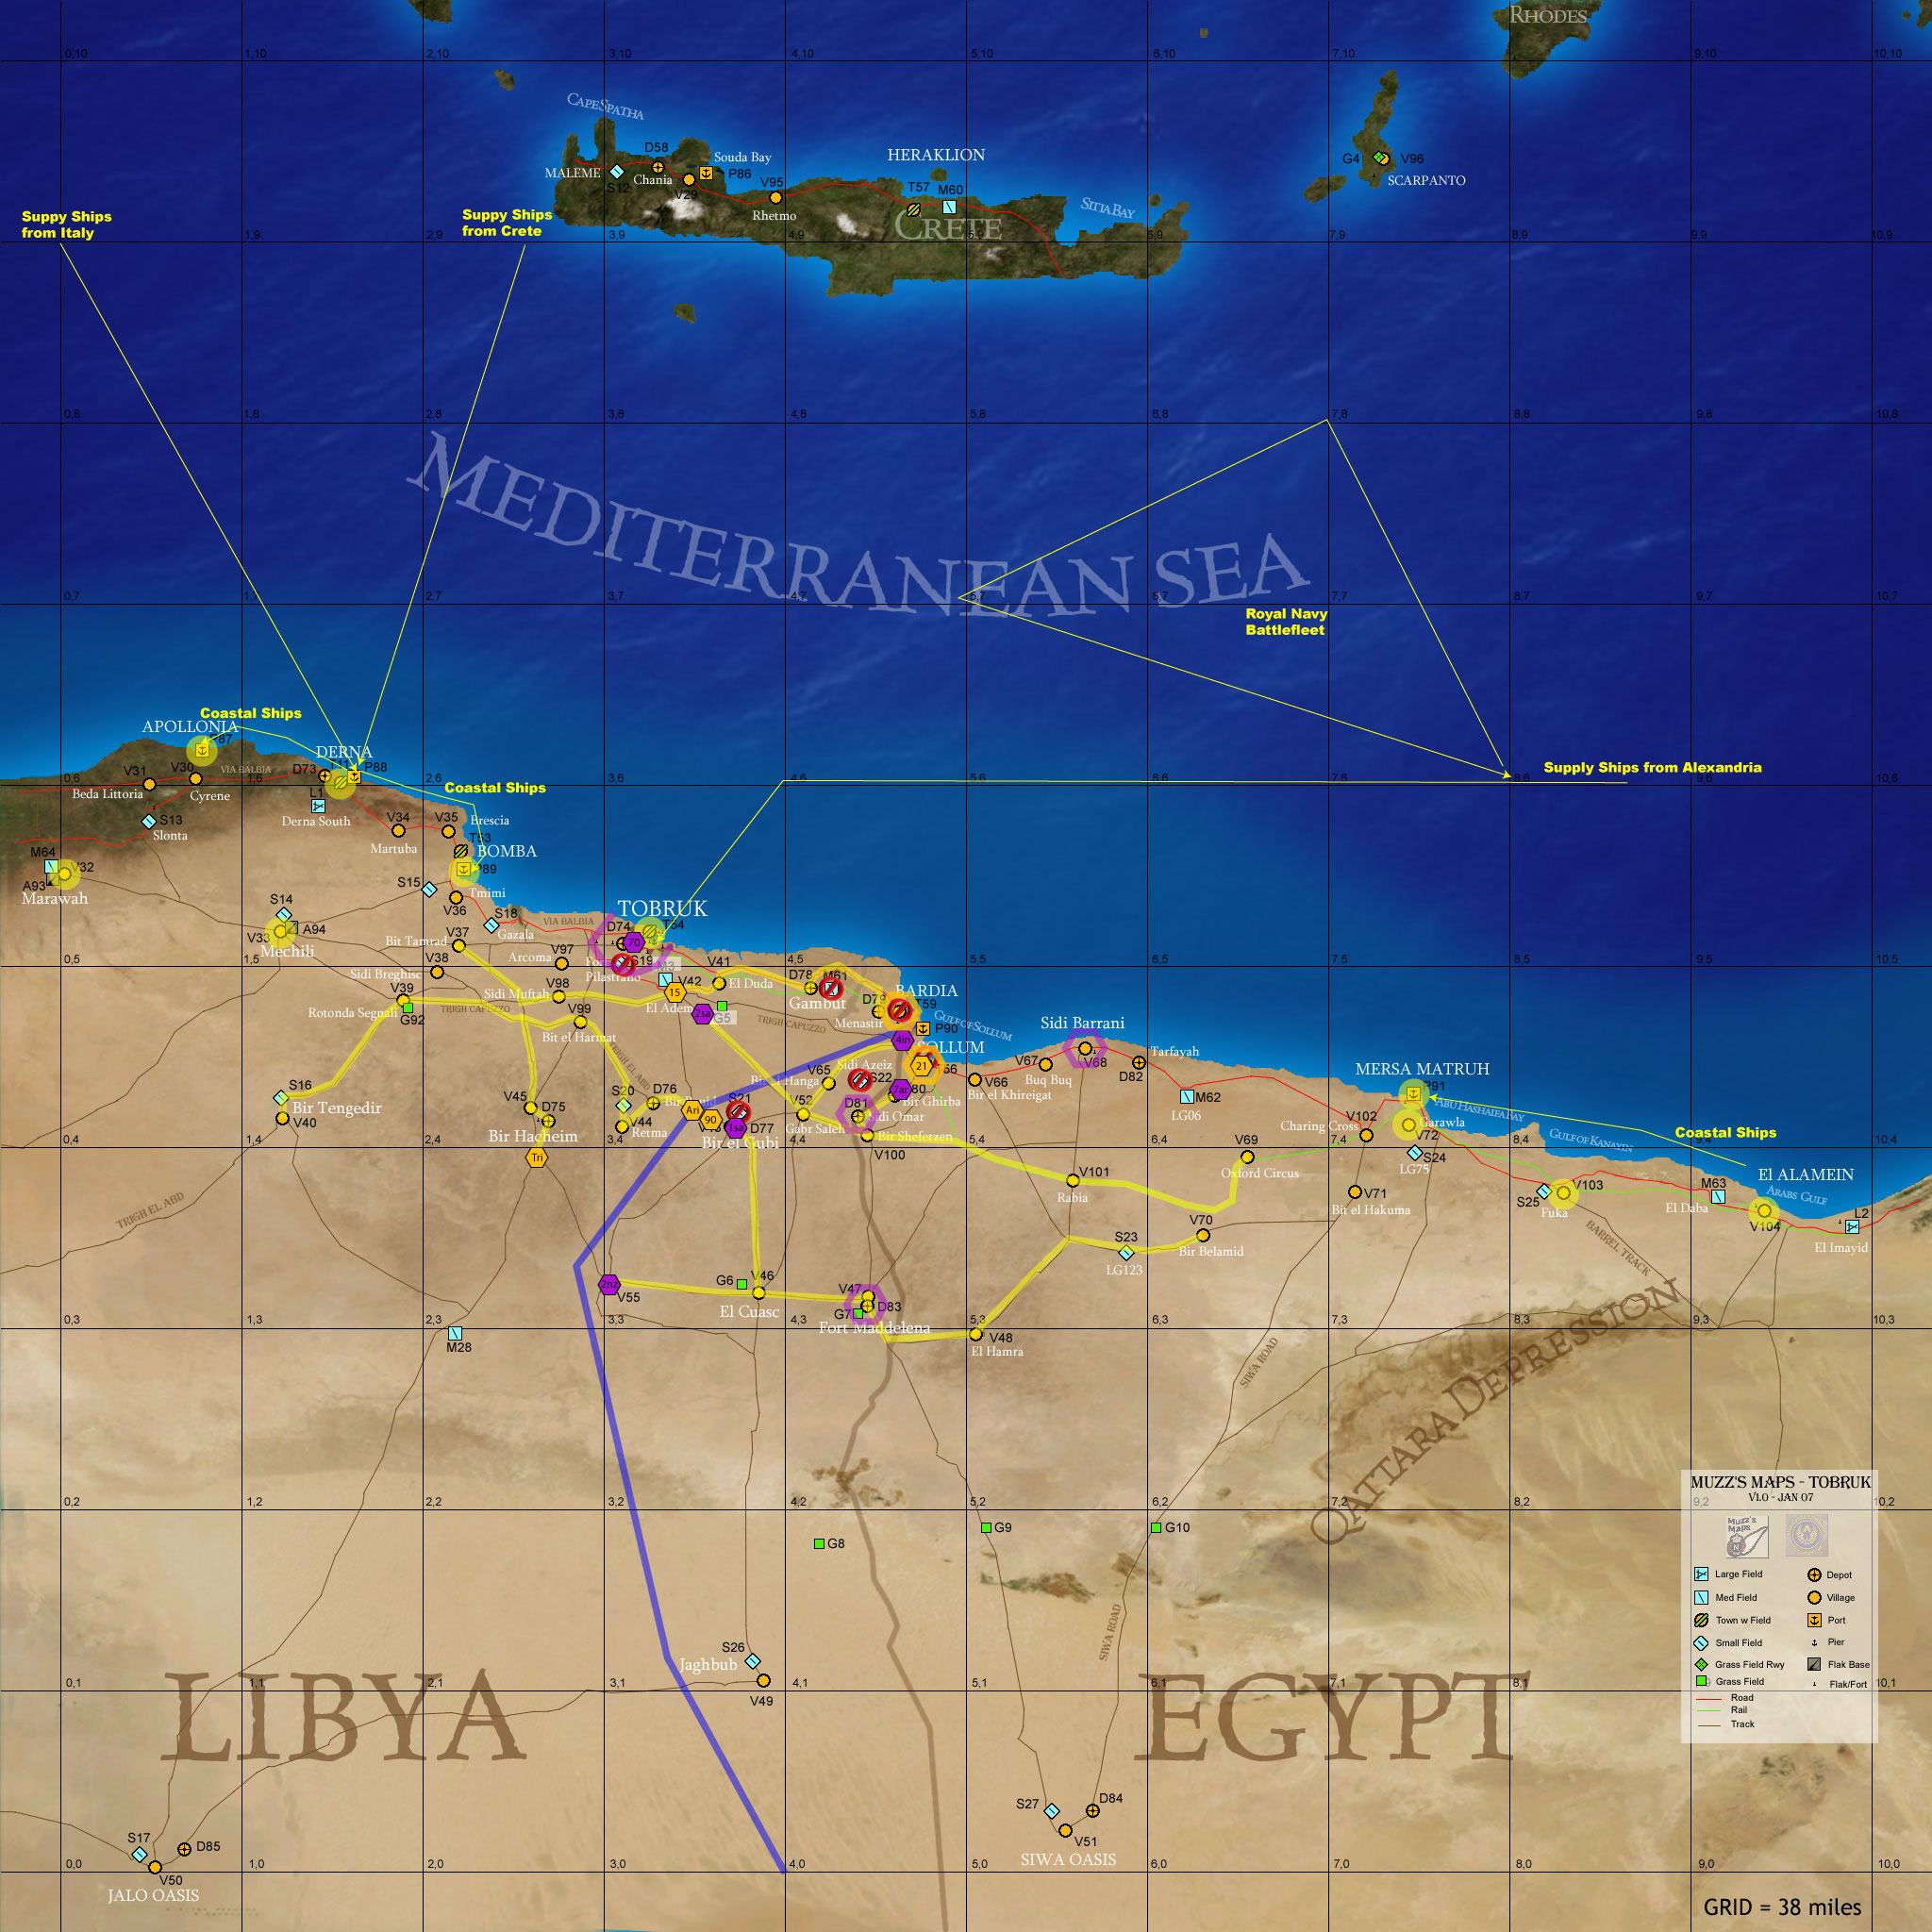
Frame 3 - MAP
- all a/c must fly with 95% fuel during frame
- S19 and S21 are closed for ops, M3 is neutral. Sollum and Bardia have ground forces right on their doorstep and cannot be used as air bases.
- 3 steps of Spitfire VBs brought in from Malta, Churchill is concerned at the heavy losses.
- 7th Arm attacks Ariete - battle W of V43 - 9:7 or 1 to 1.25 Odds - DR=7 +2 mods = 9 Ariete losses 1 strength and must retreat to D76 and cannot move.
- 15th Panzer attacks 2nd SA - battle at V52 - 10-5 or 2:1 Odds - DR=6 +1mods = 7 2SA losses 1 strength and must retreat to D46 and cannot move. 15 PZ occupies V52.
- 4th Indian attacks Sidi Omar Garrison - battle at D81 - 9-4 or 2:1 Odds - DR = 10 +2mods = 12 Sidi Omar Surrenders 4th Indian occupies Sidi Omar fortress garrison established for British
- Axis have decided to attack Tobruk and the allies to attack Sollum. The 4th Ind has reached the sea and captured P90 and cut off the 21st Panzer in Sollum. The WDAF has quickly put S22 into operation.
- if you decide to attack a garrison or ground unit by moving your units adjacent to it you have to first reduced it with heavy air attacks during the frame or have more than one unit attack it. The enemy could reinforce his garrison with his ground units in later movements so be aware of this.
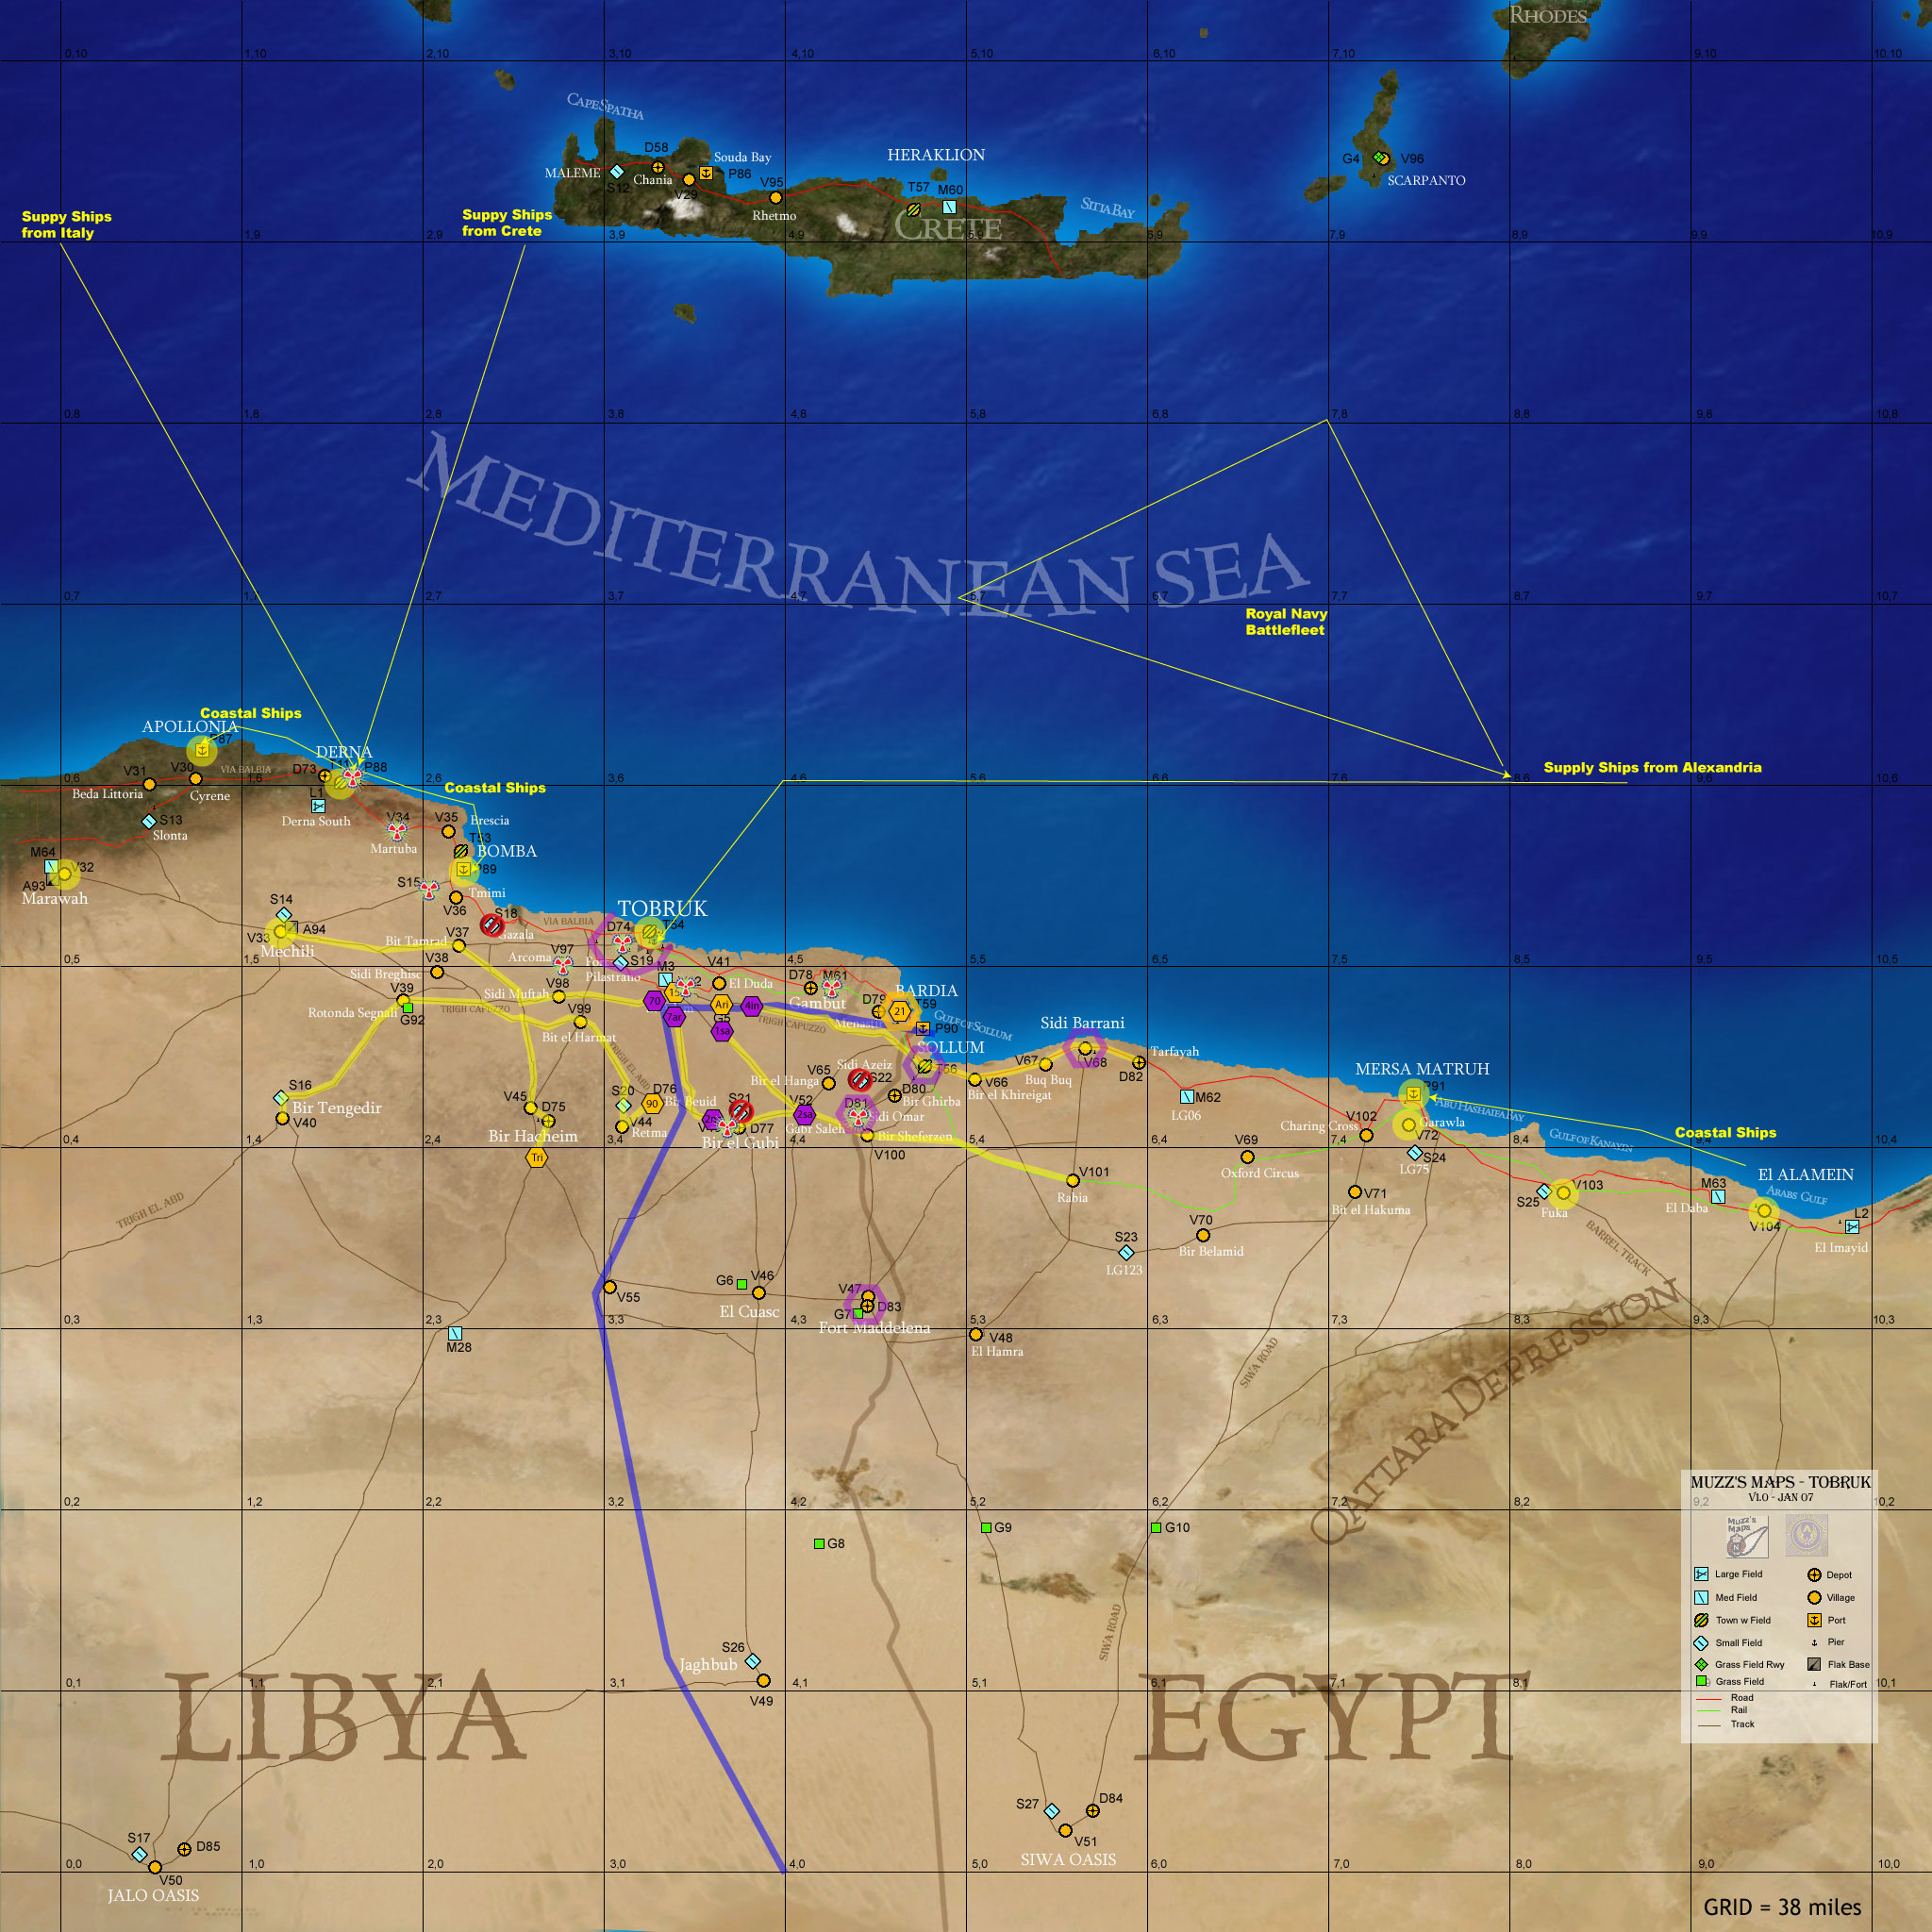
Frame 4 - MAP
- all a/c must fly with 95% fuel during frame
- S19, S22 and S21 are closed for ops, M3 and G5 are neutral. Sollum and Bardia have ground forces right on their doorstep and cannot be used as air bases.
- Two supply lines for each side have been updated, hitting locations on the yellow lines will reduce the movement of those units on the yellow lines for next frame .
- 15th PZ and Trieste attacks Tobruk and 70th Inf - battle at Tobruk - 16:14 or 1 to 1 Odds - DR=11 + 0 mods = 11 Tobruk losses 1 strength and 70th Inf losses 1 strength and cannot move.
- 2nd Ind and 2 NZ attacks Sollum and 21st Panzer - battle at V56 - 9-10 or 1:1.25 Odds - DR=11 + 2 mods = 13 Sollum losses 2 strength and 21st Panzer losses 2 strength but can still move.
- The D76 to D77 area will be full of many ground units make sure you are attacking the proper ones.
- Toggle roads off if you are at high altitude or find you are getting an FPS hit down low.
- if you decide to attack a garrison or ground unit by moving your units adjacent to it you have to first reduced it with heavy air attacks during the frame or have more than one unit attack it. The enemy could reinforce his garrison with his ground units in later movements so be aware of this.
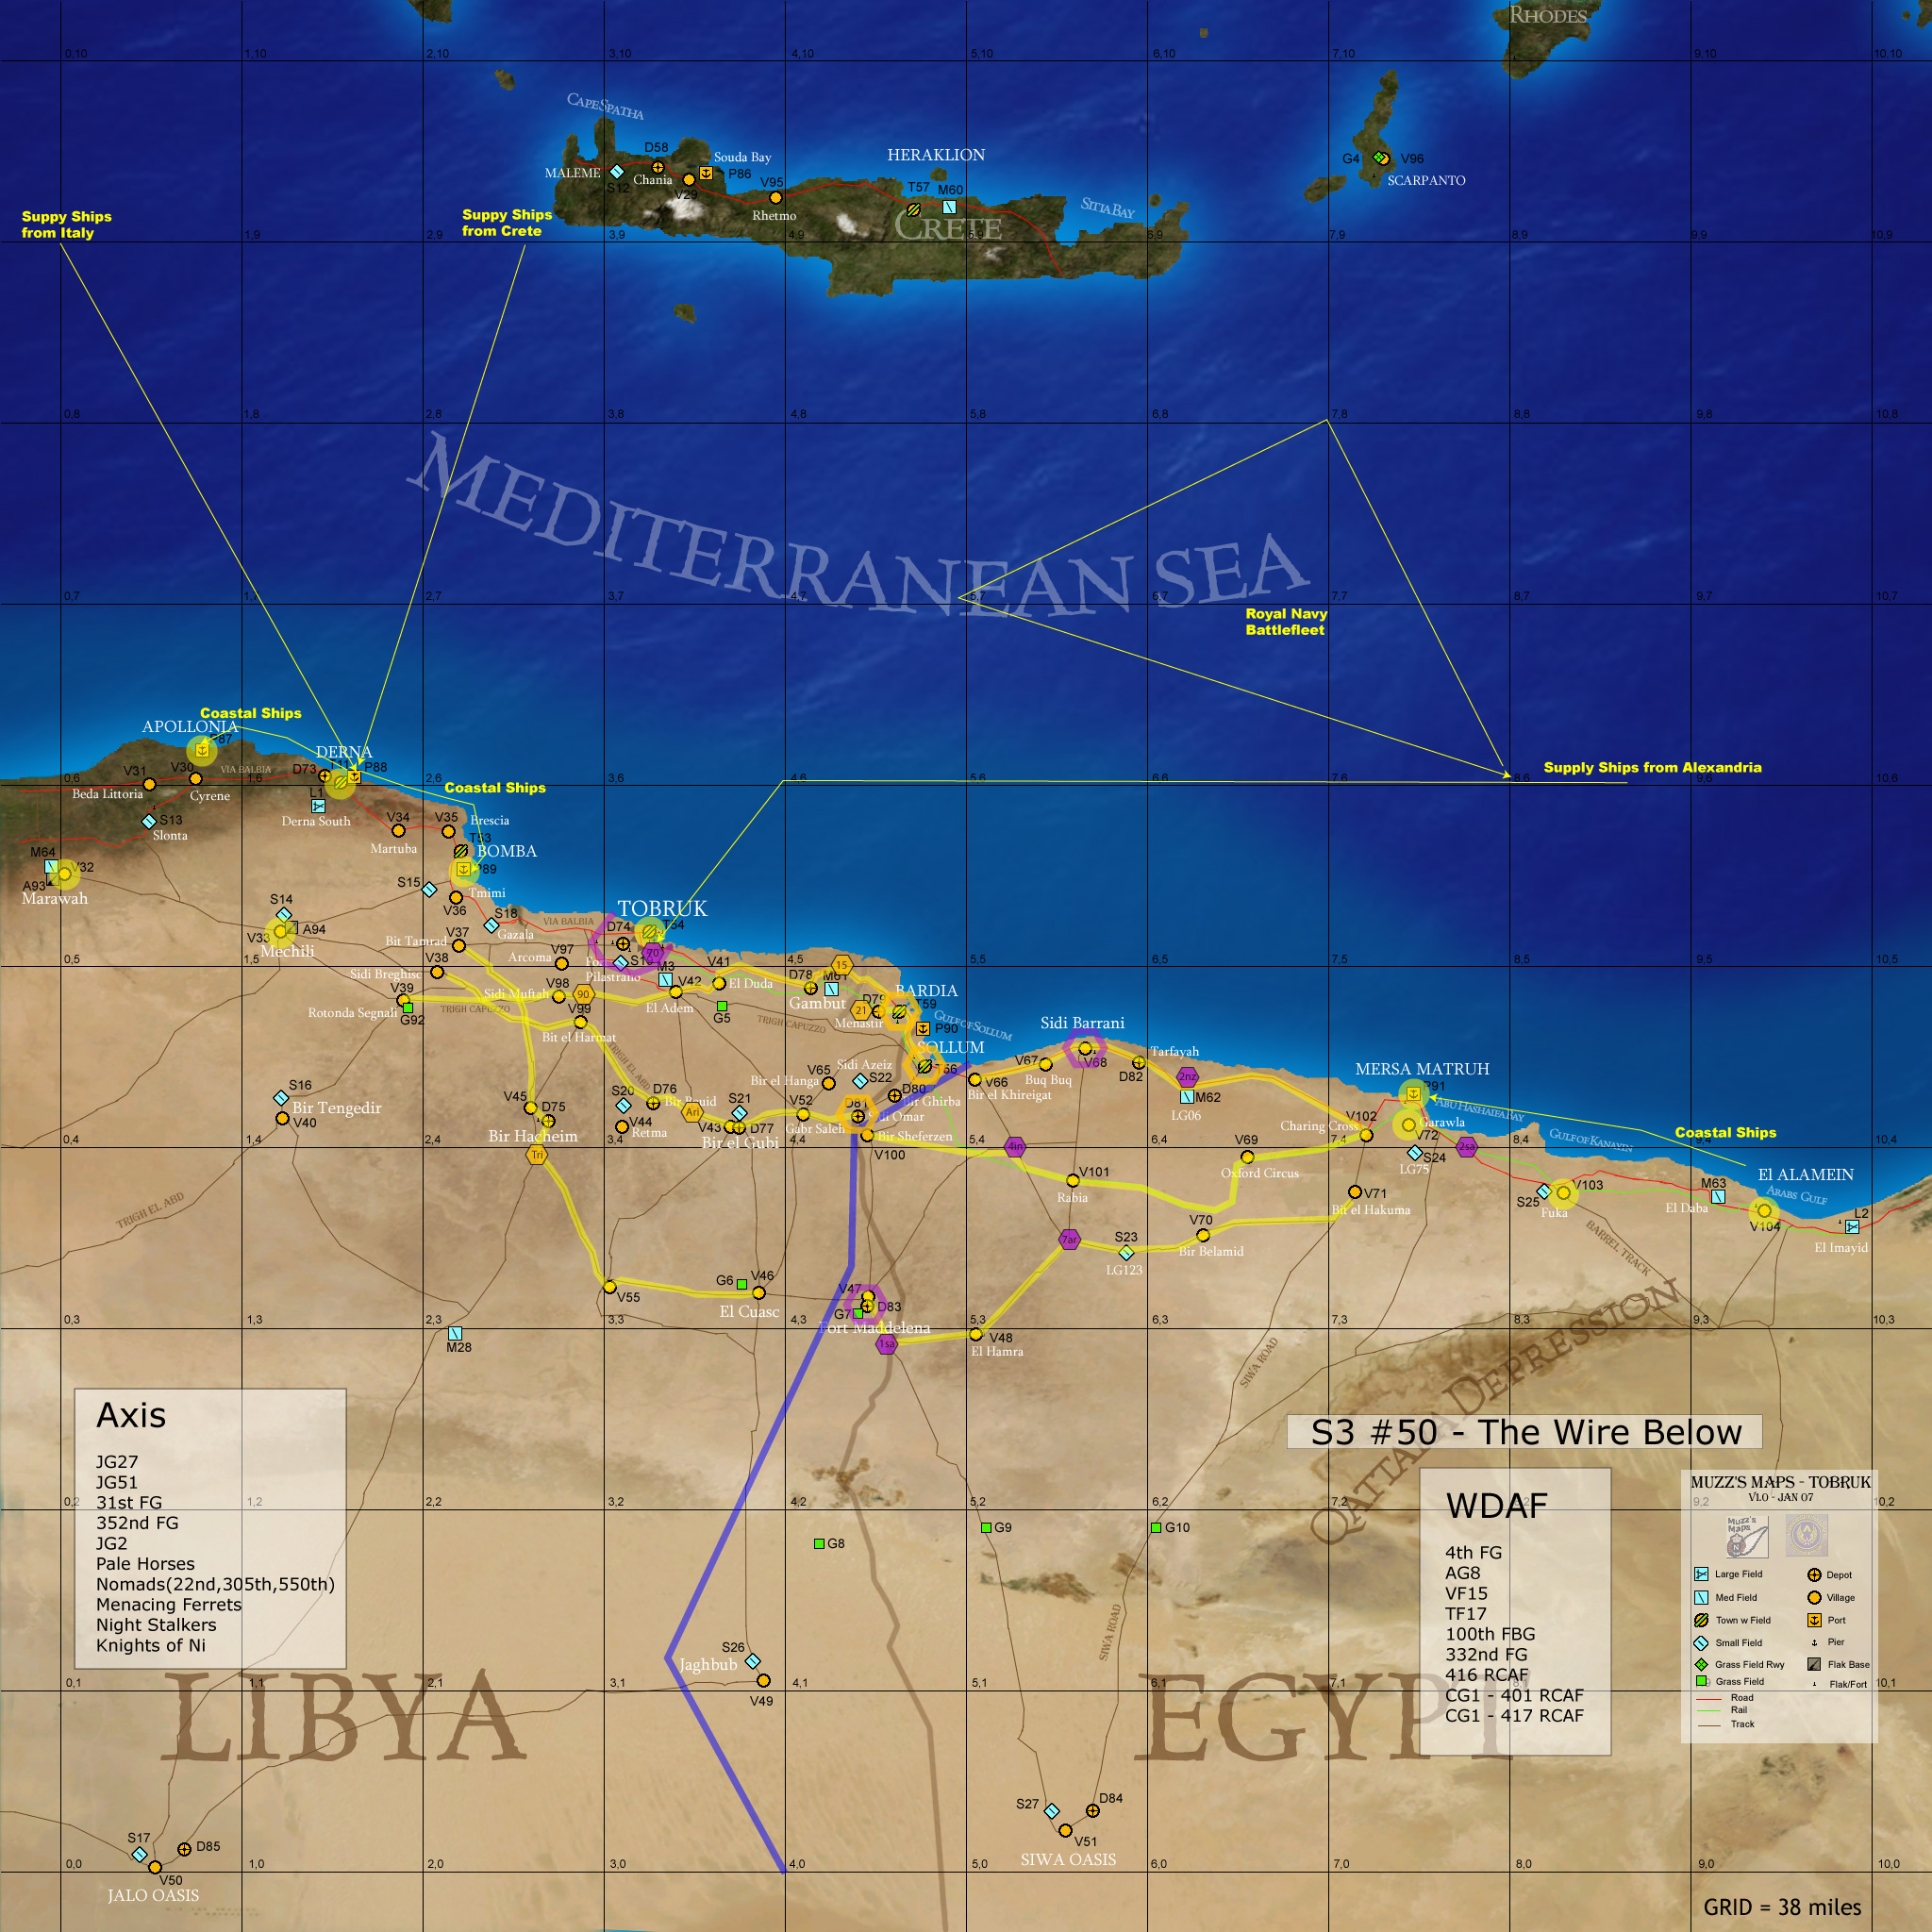
Frame 5 - MAP
- all a/c must fly with 95% fuel during frame
- S20, M28, S19 and G6 are closed for ops. M3, M61, G5 and Bardia are Axis but cannot be used for squad operations, individuals with damaged a/c may land these bases but only in emergency situations. Bardia is a supply line target even if it has no supply line.
- CV group can be used this frame and positioned off Tobruk to Bardia area now that the enemy has no airfields operational there. Frame CO decides if he wants this asset.
- British move first as they have the most points and the initiative. Both 21st PZ and 2nd SA are at cadre levels and effectively removed from play. 15th PZ, 21st PZ and Ariete are out of supply cut off by the sortie of 70th Inf from Tobruk. The fight is at V42, this is the gateway to Tobruk.
- 90th Inf attacks 1st SA - battle at Bir El Gubi - 5:8 or 1 to 1.5 Odds - DR=3 + 0 mods = 3 - 90th Inf reduced 1 strength and must retreat to D76 and cannot move next turn.
- 15th Panzer attacks and 2nd SA - battle at SE of V42 - 9-2 or 1:4 Odds - DR=8 + 2 mods = 11 - 2nd SA reduced 3 strength to cadre level and retreats to V52 and cannot move next turn.
- 7th Arm and 4th Ind attacks and 21st PZ and Sollum - battle at T56 - 12-4 or 3-1 Odds - DR=10 + 2 mods = 12 - 21st PZ reduced 3 strength to cadre level and retreats to Bardia and cannot move next turn. Sollum is garrisoned by the British.
- if you decide to attack a garrison or ground unit by moving your units adjacent to it you have to first reduced it with heavy air attacks during the frame or have more than one unit attack it. The enemy could reinforce his garrison with his ground units in later movements so be aware of this.
Final - MAP
- 4th Ind and 1st SA attacks Ariete - battle at G5 - 11:6 or 1 to 1.5 Odds - DR=3 + 2 mods = 5 - Ariete reduced 1 strength but holds at G5. Reduced 1 strength for being out of supply.
- 70th Ind and 7th Arm attacks 15th PZ - battle at V42 - 6-8 or 1:1.25 Odds - DR=8 + 1 mods = 9 - 15th PZ reduced 1 strength but holds at V42. Reduced 1 strength for being out of supply.
- Allies so close to relieving Tobruk but the Germans stand fast even if their forces at El Adem are unsupplied they fight on and hold the siege.
Special Ops - max of two per frame, pilots may switch back to regular a/c after mission is completed.
- Derna Harbour Raid - several small coastal lighters are in Derna Harbour(P88), use 2 sunderlands(Lanc) to sink them. This may launch during night. DONE
- Night Raid - use 2+ Marylands(Do17s)) to bomb a Axis garrison during the night. DONE
- Airborne Drop - use 2+ C47s to drop SAS near any one of the airfields in the Green Mountains(M64,S13,L1) This may launch during night. DONE
- Resupply - use at least 2+ C47s to land inside the Tobruk perimeter(S19). This may launch during night. DONE
- Convoy Attack - use 6+ Beauforts(Ju88s) to launch torpedo attacks against a large ship convoy heading to Derna east of Crete. This must be a daylight raid. DONE
- Oil Tanker Recce - use 1 sunderland(Lanc) to locate and if possible attack an oil freighter north of Derna along either shipping lane. DONE
- Harbour Mining - use at least 2+ Marylands(Do17s) to drop mines off Bomba(P89) harbour. This may launch during night. DONE
- Night Raid - use 2+ Marylands(Do17s) to bomb a Axis depot during the night. DONE
S3 Clarifications
- the S3 staff reserves the right to make a ruling on questions or game
situations not answered completely or missed by the rules. For
further clarification please post on the S3 forum or email Jabo.
[
Aircraft - Series
Map - Player Rules ] |